beauty

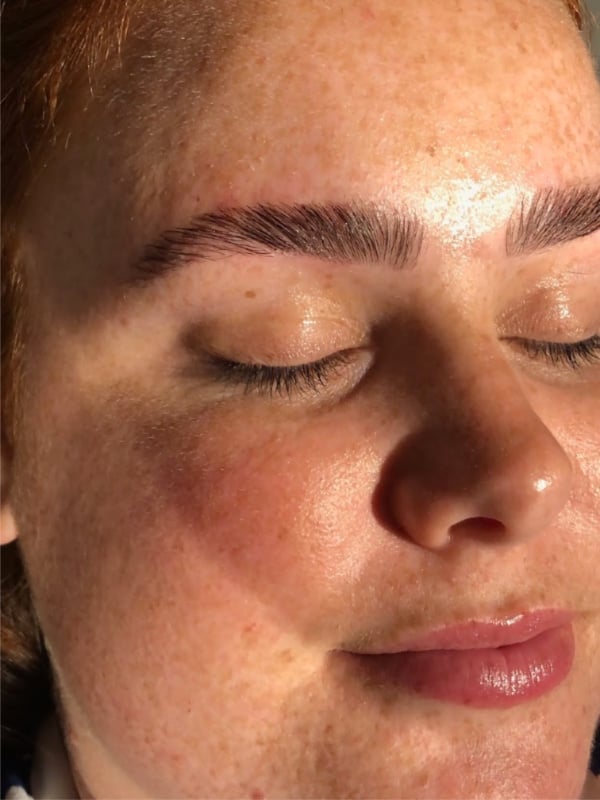
TRIED AND TESTED: I had my brows laminated and now they look perfect with zero effort.


Mamamia’s Tried and Tested series is your weekly review of the latest to hit our desks in beauty, health and wellness. You won’t find any #sponsored content here, just honest, relatable and independent advice. This week, Senior Lifestyle Writer Amy Clark road-tested brow lamination.

Earlier this week, I caused quite a stir in Mamamia’s You Beauty Facebook group. (If you’re not in it already, we’re in a fight.)

Why? Because I had my eyebrows laminated. Yes, laminated.

Brow lamination is a new-ish beauty treatment out of Russia that promises to turn even the flattest, unruliest eyebrows into big, bold, fluffy ones that belong on Instagram. And when I posted a photo of my fresh, new brows in the Facebook group, everyone promptly lost their sh*t and needed to know everything.

There’s a lot to cover, so I’ll get right into the intricate details of brow lamination, from how it actually works and if it’s safe, to my brow lamination before and after photos.

Here’s a video of me having my brows laminated so you can see what it actually looks like. It’s a lot. Post continues after video.

Video via Mamamia
ADVERTISEMENT

Brow lamination – what you need to know.

What is brow lamination?

Dusanka Mijich, Director and Owner of Star Hair & Beauty, describes brow lamination as a treatment that provides a similar result to microblading (eyebrow tattooing) that’s pain-free and without any downtime. Think of it like a perm or chemical straightening for your eyebrows.

“Brow lamination is a technique used on the brows to create voluminous, full, feathery brows that are defined and yet natural looking. The treatment restructures the brow hairs to keep them in a desired shape for up to eight weeks,” she told Mamamia.

How does eyebrow lamination work?

Mijich explained brow lamination works in two stages – lifting and setting.

First, a lifting solution is applied onto clean brows to break the bonds in the hair so the technician can brush them up into the desired shape using tweezers and a spoolie (a naked mascara wand). This solution is processed under some glad wrap and how long this takes depends on how thick your brows are to start with.

Next comes the setting solution, which will set your brows into their new restructured shape. This is also processed under glad wrap before the technician will clean the brows and do any final shaping and tinting. This whole process takes around an hour.

ADVERTISEMENT

Brow lamination results.

There are varying degrees of hectic-ness one can have with their brow lamination. A technician can shape your eyebrows into anything from sleek and groomed or a slightly brushed up, fluffy look, to a full blown Cara Delevingne editorial brow.

How long does brow lamination last for?

How long your brow lamination will last for depends on your hair cycle. Like your eyelashes, your brow hairs have a hair renewal cycle during which old hairs fall out and new hairs come through. Most people will have a growth cycle of around 30 days, so your brow lamination can last anywhere from three to eight weeks.

Brow lamination after care.

You’ll need to keep your brows dry and away from heat and steam for 24 hours – no washing your hair or exercising (I know, bummer). Mijich also advised brushing your brows daily with a clean spoolie and applying a serum or oil onto the brows to keep the hair hydrated as the chemicals can dry them out.

ADVERTISEMENT

Brow lamination risks/side effects.

Brow lamination isn’t for everyone. This technique only works if you already have brow hairs to be lifted, so those with very thin or non-existent brows would be better suited to microblading.

If you’ve ever had a severe reaction to eyebrow tinting or a lash lift, or your skin is highly reactive, it’s also probably not for you. You also need to mindful of having your eyebrows laminated within two weeks of having any skin peels or cosmetic facial procedures.

Where to get brow lamination in Australia.


View this post on Instagram


A post shared by BEAUTY, BROWS & SKIN (@royalsclinicaustralia) on

ADVERTISEMENT


View this post on Instagram


A post shared by AT YOUR BROW SERVICE ✨ (@amy.jean.brow.agency) on


View this post on Instagram


A post shared by EYEBROW & EYELASH SPECIALIST (@parlourdala) on

ADVERTISEMENT

Brow lamination isn’t widely available in Australia yet as the treatment is still fairly new. For brow lamination in Sydney, you can go to Star Hair & Beauty (this is where I had mine done), Royals Clinic AustraliaParlour Dala, or Amy Jean Brow Agency. Amy Jean also has clinics in Melbourne, Gold Coast, Brisbane and Byron Bay.

That said, I can only speak to where I had my brow lamination done. Get on Google and do your research because, just like bad lash lifts, there are bad brow laminations. Ask lots of questions and be wary of anywhere that can’t offer you testimonials or before and after photos.

ADVERTISEMENT

Brow lamination cost.

A standard brow lamination costs $90 for the lamination and a shape (any tweezing or trimming after the treatment). You can also add on an eyebrow tint afterwards, which can cost around $20 to $30 on top.

My brow lamination before and after.

That’s the facts out the way, so let me recap exactly what it’s like to have your brows laminated.

I went in not knowing much about what I’d gotten myself into, but the process was very similar to getting a lash lift: you lie down for about an hour, whiffing fairly strong chemicals and feeling some mild stinging around the brow area.

The entire process is pain-free and fairly relaxing, and the technician took the time to explain each step as she was doing it. I’ll admit, I spent the entire time watching her straighten and tweak my brows through the selfie mode on my phone camera because, content. But when I saw the finished result, I was completely amazed. Plus, all the women in my office remarked how incredible my eyebrows looked. You can see my brow lamination before and after photos below.

brow lamination
Step 1: Pull brows into shape after applying the lifting solution. Image: Supplied/Amy Clark.
ADVERTISEMENT
brow lamination
Step 2: Process the lifting solution (this is when you start to smell the chemicals). Image: Supplied/Amy Clark.
ADVERTISEMENT
brow lamination
Step 3: Glad wrap those brow babies up. Image: Supplied/Amy Clark.
brow lamination
Step 4: Apply the setting solution and glad wrap up again. Image: Supplied/Amy Clark.
ADVERTISEMENT
brow lamination
Step 5: Remove all the solutions. Image: Supplied/Amy Clark.
ADVERTISEMENT
brow lamination
Step 6: Trim and shape those bad boys. Image: Supplied/Amy Clark.
brow lamination
Step 7: Apply a hectic tint. Image: Supplied/Amy Clark.
ADVERTISEMENT
brow lamination
Step 8: Take a photo of the finished result in excellent lighting. Image: Supplied/Amy Clark.
ADVERTISEMENT
brow lamination
Here's a closer look at my 'before' brows. Image: Supplied/Amy Clark.
brow lamination
And here are my 'after' brows. Image: Supplied/Amy Clark.
ADVERTISEMENT

It wasn't until I got home that night and my partner said something along the lines of 'what the eff have you done to your brows' that I realised they were a bit... hectic.

Expect to feel quite conspicuous for at least a few days after having your brows laminated, especially if you had them tinted at the same time. The tint will fade by day four or five, and you'll get used to how your face looks with your new brows.

As for whether the results are a) any good and b) legitimately time saving, it's a heck yes to both. When I wake up in the morning, all I have to do is use a spoolie to brush them into shape. It takes a while to get the hang of finding the perfect shape, but you can also use the spoolie to taper edges and tails to make them look less feathered and more polished if you like.

ADVERTISEMENT

The thing that's made the biggest difference is not having to use any eyebrow products to make my brows hold their shape all day, because once you've brushed your laminated brows up, they WILL NOT FALL DOWN. At all. One downside: my brow hairs do feel a bit wiry and dry, so I've been slathering on all the ointments and oils.

brow lamination
This is my brows and I straight out of the salon. Image: Supplied/Amy Clark.
ADVERTISEMENT
brow lamination
Here we are a few days later once the tint had settled down. Image: Supplied/Amy Clark.
brow lamination
An FYI, this is what the brows look like in the morning. Image: Supplied/Amy Clark.
ADVERTISEMENT
brow lamination
And here's me wearing lots of makeup and NOTHING on my brows. Image: Supplied/Amy Clark.
ADVERTISEMENT

Final verdict...

Now I've emotionally recovered from the shock of having Instagram eyebrows in real life, I'm digging them.

Are they perfect? No. I still spend between 30 seconds and a couple of minutes brushing them into place (and then scruffing them up and re-brushing them) and have a little brow bald patch that needs tending to with a brow pencil. A few of my brow hairs are also a bit unruly and require extra attention, but it's minor and far less maintenance than having to style your brows every morning.

The way I see brow lamination is the same way I see a lash lift. It's a great extra thing to do if you have the time or money, but even better done before a big event or a holiday to save time and space in your toiletries bag. And who wouldn't want that?

Have you tried brow lamination? Tell us your thoughts in the comments below!

Mamamia's Tried and Tested series drops every week. Want us to trial and review a product or treatment you've seen everywhere? Easy, just send an email to submissions@mamamia.com.au. 

You can catch up on more from our Tried and Tested series here: