kids

5 of the best RecipeTin Eats dishes, according to Mamamia.

What's better than a hearty homemade meal? One that wasn't hard to make.

As a self-proclaimed terrible cook, I've only ever prided myself in being able to make a delicious bowl of cereal (add milk first — thank me later). But it's 2024 and I need to get my game together. 

I asked my colleagues at Mamamia to share their favourite recipes on RecipeTin Eats, a blog created by Sydney-based cook Nagi Maehashi that everyone and their dog seems to be obsessed with.

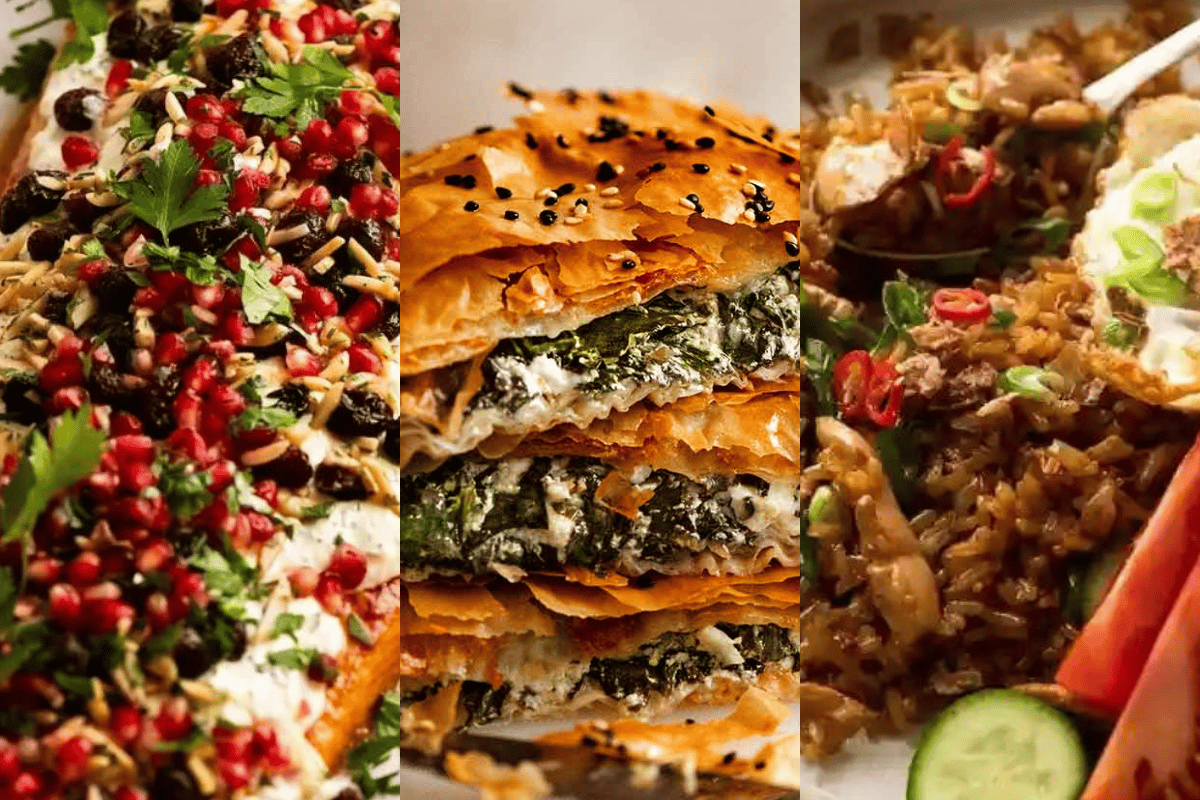
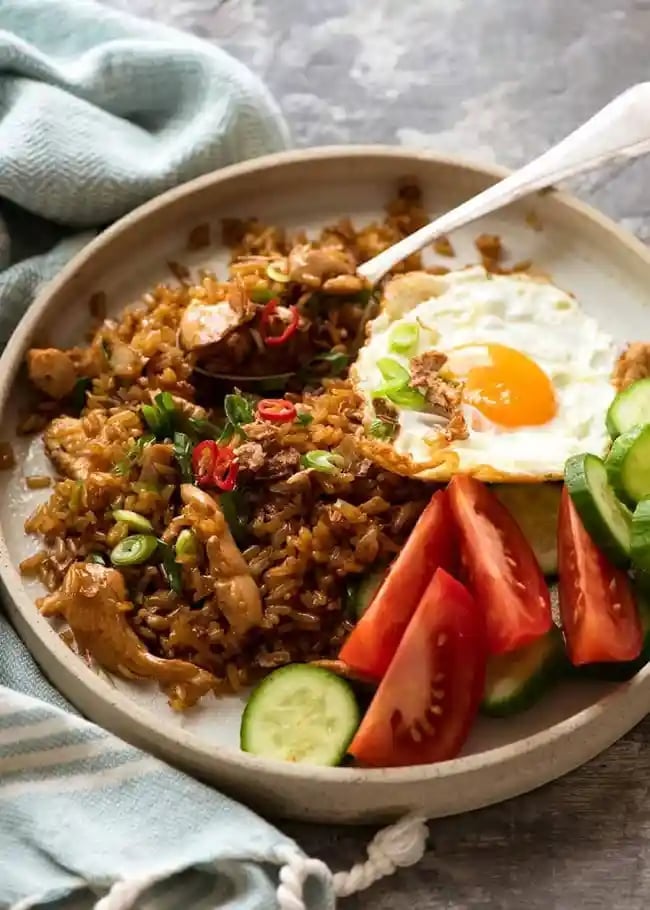
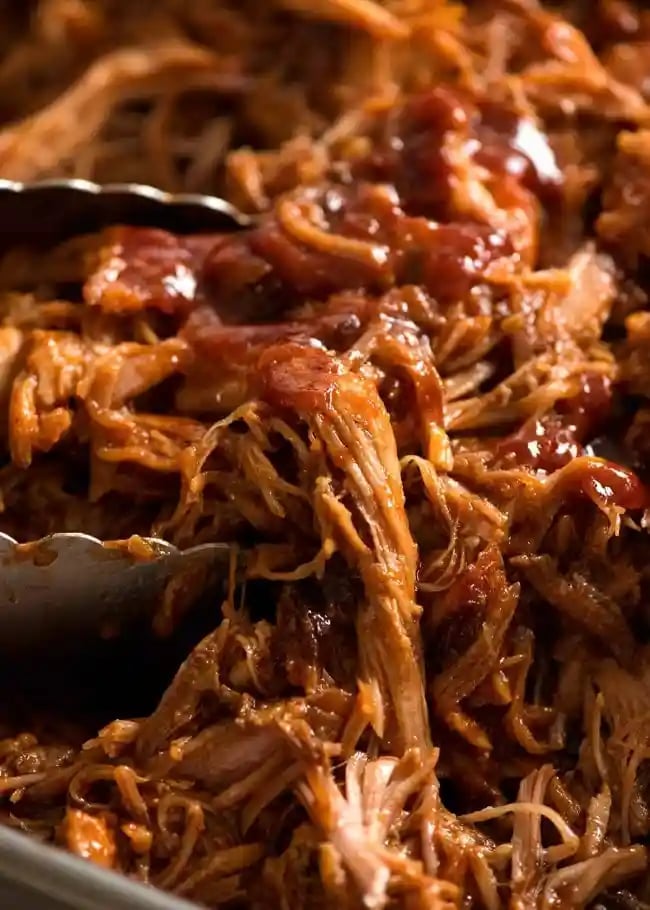
Here are the RecipeTin Eats dishes they rate the most.

1. Slow Cooked Shredded Beef Ragu Pasta.

"I recommend making this on a lazy Sunday afternoon — do the prep mid-afternoon, watch a movie while it cooks and enjoy a big bowl come dinnertime. If there's one recipe I insist you make, it's this." — Charlotte Begg, Morning Editor.

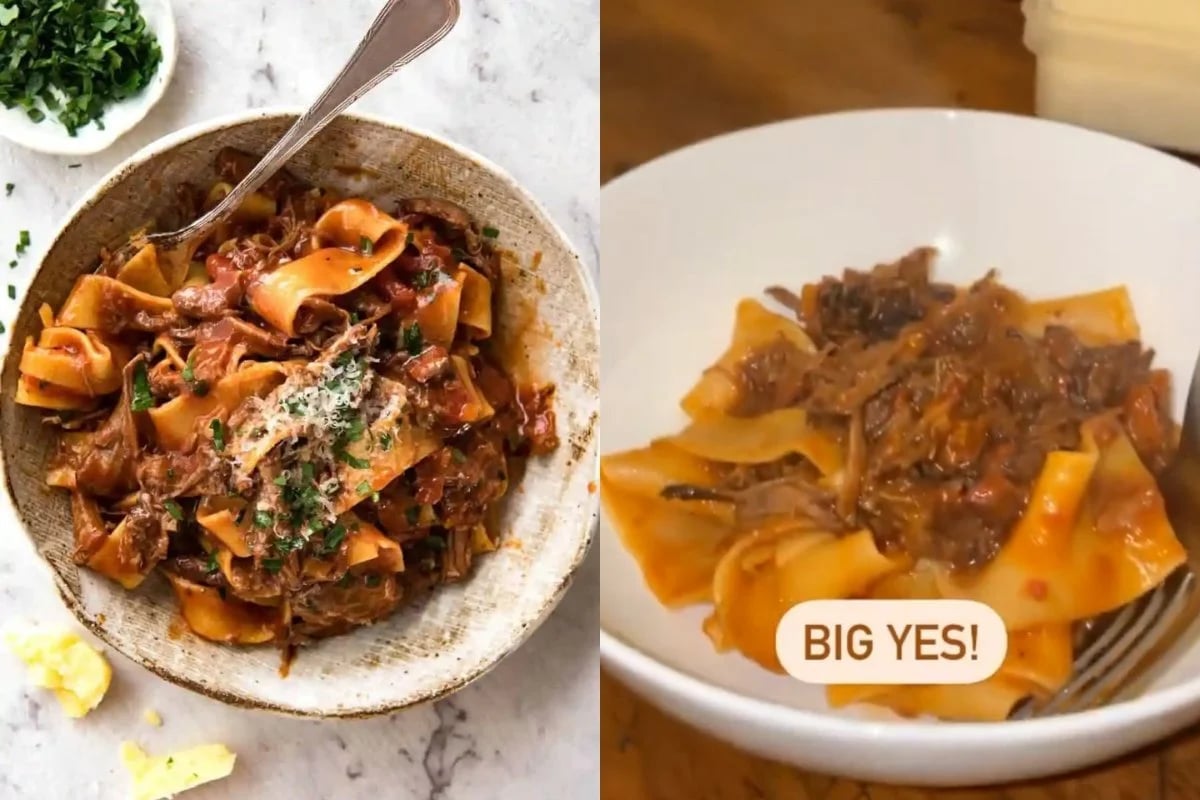
Nagi's version and Charlie's version. Image: RecipeTin Eats/Supplied.

ADVERTISEMENT

Prep: 20 minutes.  

Cook: 2 hours 30 minutes.

Servings: 5-6 people.

Ingredients:

Ragu

  • 1.2kg chuck beef or other slow-cooking beef cut, cut into equal 4 pieces (Note 1)
  • 1 tbsp salt
  • Black pepper
  • 3 tbsp olive oil, separated
  • 3 cloves garlic, minced
  • 1 onion, diced
  • 1 cup carrots, diced (Note 2)
  • 1 cup celery, diced (Note 2)
  • 800g crushed canned tomatoes
  • 3 tbsp tomato paste
  • 2 beef bouillon cubes, crumbled (Note 3)
  • 1 cup/250ml red wine, full-bodied (like merlot, cabernet sauvignon), or sub with beef broth/stock
  • 1 1/2 cups/375 ml water (Note 3)
  • 3/4 tsp dried thyme or 3 sprigs fresh thyme
  • 3 dried bay leaves

To serve (not all sauce is used)

  • 1 lb /500g dried pappardelle, or other pasta of choice (Note 4)
  • Freshly grated parmesan cheese or Parmigiano-Reggiano
  • Fresh parsley, finely chopped (optional)

Instructions:

1. Pat beef dry and sprinkle with salt and pepper.

2. Sear beef: Heat 1 tbsp olive oil over high heat in a heavy-based pot. Add beef and sear each piece aggressively on all sides until very browned (3-5 minutes in total), then remove onto a plate.

3. Turn the stove down to medium-low and add the remaining 2 tbsp of olive oil.

4. Soffrito: Add garlic and onion and sauté for 2 minutes. Then add the carrots and celery and sauté slowly for 5 minutes.

5. Add the remaining ragu ingredients and return the beef to the pot (including pooled juices). Turn the stove up and bring it to a simmer, then turn it down to low so it's bubbling very very gently. (Note 6).

6. Slow cook: Cover the pot and let it cook for 2 hours or until the beef is tender enough to shred. 

ADVERTISEMENT

7. Shred: Remove beef then coarsely shred with 2 forks. Return beef to the pot. Simmer for 30 minutes until sauce is reduced and thickened-beef will soften slightly more during this step.

8. Final season: Do a taste test and adjust the seasoning to your taste with salt and pepper. Also, add 1/2 tsp sugar if the sauce is a bit sour for your taste (Note 5). Place the lid on and set aside until ready to serve (it's even better the next day and freezes well for months!).

To serve:

1. Bring a very large pot of water with 1 tbsp of salt to the boil.

2. Add pasta and cook for 1 minute less than the recommended cooking time as per the packet instructions.

3. Meanwhile, place 5 cups of the Ragu in a very large fry pan or Dutch oven or use 2 normal-size fry pans. Heat over high heat while the pasta is cooking.

4. When the pasta is ready, transfer it directly from the pot into the frying pan using tongs.

5. Add 3/4 cup of pasta water into the frying pan.

6. Gently toss the pasta (I use 2 wooden spoons) for 1 to 2 minutes, until the sauce water evaporates and leaves you with a thick Ragu sauce that coats the pasta.

7. Yell for your family to sit down at the dinner table because you need to serve it immediately!

8. Serve with plenty of freshly grated parmesan, or even better, with Parmigiano Reggiano.

ADVERTISEMENT

Notes:

1. Beef — Cut the beef into 4 pieces that are around the size of a baseball.

2. Celery and carrots sautéed with onions and garlic is called "soffrito" in Italian cooking. It is a very traditional base for many Italian dishes. Cooking them slowly over low heat releases their flavour and adds an extra dimension to this dish. But it's not a deal killer if you skip these ingredients.

3. Beef stock — You could use liquid beef stock instead of water and stock cubes.

4. Pappardelle pasta is thick wide pasta and is ideal for this recipe because the shreds of beef cling to the thick pasta strands. If you can't find it, just use the widest pasta you can find e.g. tagliatelle, or fettuccine.

5. Sugar — The sweetness of canned tomatoes differs depending on the brand (typically more expensive = sweeter). So adjust the sweetness of your sauce to your taste by using sugar — 1/2 tsp at a time.

6. Low and slow — Turn the heat of the stove down to a level where it is bubbling very, very gently— a few bubbles here and there. This is usually low on gas stoves but might be medium-low on electric stoves. If it is too high. I.e. simmering rapidly (lots of bubbles appearing rapidly) — then you run the risk of the bottom burning. If it is too low, it will take longer to cook.

2. Nasi Goreng (Indonesian Fried Rice).

"Talk about a quick meal! I can make this Nasi Goreng in less than 20 minutes and it tastes like heaven. Fills me up and leaves a little extra for leftovers for my husband and I." — Basmah Qazi, Senior Lifestyle Producer.
RecipeTinEat's Nasi Goreng (Indonesian Fried Rice). Image: RecipeTineEats.

ADVERTISEMENT

Prep: 10 minutes.

Cook: 10 minutes.

Servings: 4 people.

Ingredients: 

Chicken:

  • 1 tbsp oil
  • 5 oz / 150g chicken breast, thinly sliced (or other protein)
  • 1 tbsp kecapmanis (Note 1)

Rice:

  • 1.5 tbsp oil
  • 2 garlic cloves, finely chopped
  • 1 tsp red chilli, finely chopped (Note 2)
  • 1 onion, small, diced
  • 3 cups cooked white rice, day-old, cold (Note 3)
  • 2 tbsp kecapmanis (Note 1)
  • 2 tsp shrimp paste, optional (Note 4)

Garnishes/Side Servings (optional):

  • 4 eggs, fried to taste
  • 1 green onion, sliced
  • Tomatoes and cucumbers, cut into wedges/chunks
  • Fried shallots, store-bought, optional (Note 3)
  • Lime wedges

Instructions:

1. Heat oil in a large skillet or wok over high heat.

2. Add chilli and garlic, and stir for 10 seconds.

ADVERTISEMENT

3. Add onion, and cook for 1 minute.

4. Add chicken, cook until it mostly turns white, then add 1 tbsp kecap manis and cook for a further 1 minute or until chicken is mostly cooked through and a bit caramelised.

5. Add rice, 2 tbsp kecap manis and shrimp paste, if using. Cook, stirring constantly, for 2 minutes until sauce reduces down and rice grains start to caramelise (key for flavour!).

6. Serve, garnished with garnishes of choice (green onions, red chilli, fried shallots).

To serve:

1. Serve as a side — for Asian main dishes or as part of a large spread, Asian or not!

2. Make it a meal — traditional Indonesian style: Serve with a fried egg sunny side up (runny yolk!), tomato wedges and slices of cucumber on the side.

Notes:

1. Kecap Manis (sometimes called Ketjap Manis) is an Indonesian sweet soy sauce that is thicker than other soy sauces. Sometimes just labelled as "sweet soy sauce". Consistency resembles maple syrup, available in most supermarkets in Australia (Woolworths, Coles, Harris Farms).

Also easy to make your own! Just combine 1/4 cup ordinary soy sauce (I use Kikkoman) and 1/4 cup brown sugar over medium heat. Bring to a simmer and reduce until it becomes a maple syrup consistency. It will thicken more when it cools.

2. Chilli — I use two bird's-eye or Thai red chillies, it adds a mild warmth and doesn't make it spicy. Adjust to taste. Chilli paste can also be used instead — add it when you add the rice.

ADVERTISEMENT

3. Day-old cooked rice — All types of fried rice are best made using day-old cooked rice that has been refrigerated overnight. It dries it out, making it easier to stir fry to evenly coat the grains with the flavourings. TIP: Keep bags of cooked rice in the freezer! Fabulous for fried rice, or even using plain.

4. Shrimp paste — Adds depth of flavour and complexity, but is optional. Traditional dish uses belacan which is dried shrimp blocks, that require crumbling and then toasting before use. The same flavour is achieved with any shrimp paste which you can just dollop in. Any shrimp paste brand/type is fine.

5. Fried shallots are sliced shallots that have been fried until crunchy. They are a great garnish and add a pop of texture to the dish but are optional because it's not traditional! Fried shallots can be purchased at most supermarkets in Australia (see here for Woolworths).

6. Make this gluten-free by making your kecap manis (Note 1) using Tamari.

7. Storage — as with all fried rice, it keeps great for a day or two in the fridge then I find it gets a bit dry. Salvage it with a sprinkle of water then microwave it — makes it all steamy and moist again! Do the same if you freeze it. 

3. Pulled Pork with BBQ Sauce.

"Made this for my birthday on the weekend for a large group of friends. It was the dish of the night and they all loved it." — Alex Anastassiou, Social Team Lead.

ADVERTISEMENT

RecipeTinEat's Pulled Pork with BBQ Sauce (Easy Slow Cooker). Image: RecipeTinEats.

Prep: 20 minutes.

Cook: 2 hours 30 minutes.

Servings: 12-20 people.

Ingredients:

  • 3.5-4.5kg/ 5-7lb pork butt/pork shoulder, bone-in, fat cap on (Note 1)
  • 1 cup beer, apple cider or apple juice (Note 2)

Rub:

  • 3 tbsp brown sugar
  • 1 tbsp paprika powder
  • 1 tbsp garlic powder
  • 2 tsp onion powder
  • 2 tsp mustard powder
  • 1 tsp cumin powder
  • 1 tbsp salt
  • 1 tsp black pepper

BBQ Sauce:

  • 1 cup apple cider vinegar (Note 3)
  • 3 cups tomato ketchup (or Aussie tomato sauce)
  • 1 cup water (or use remaining beer!)
  • 3 tbsp molasses, original (not blackstrap, Note 4)
  • 2/3 cup brown sugar
  • 4 tsp mustard powder
  • 3 tsp garlic powder
  • 4 tsp Worcestershire sauce
  • 2 tsp salt
  • 2 tsp black pepper
  • 2 tsp Tabasco or cayenne pepper (optional, for spiciness)

Instructions:

  • Mix the rub, then rub all over the pork.
  • Place in a slow cooker, and pour over beer. Slow cook on low for 10 hours. Pork should be tender enough to easily shred.

Browning in the oven (Optional but recommended):

  • Preheat oven to 180°C/350°F.
  • Transfer from the slow cooker into a roasting pan (reserve liquid).
  • Scoop fat off the surface of juices in the slow cooker and drizzle over pork (about 1/3 cup), then roast pork for 20 minutes.
  • Remove from oven, cut a thick layer of fat off top and discard. Spoon over 1/4 cup fat from slow cooker juices, then roast for 15 minutes.

Shredding:

  • Shred pork using 2 forks. Pour over BBQ sauce and toss gently.
  • Serve stuffed in sliders with Coleslaw, or make a Southern dinner plate with Coleslaw, Mac and Cheese, Cornbread, steamed corn and green beans tossed in butter, with Margaritas to quench your thirst!

BBQ Sauce:

  • Place all ingredients in a saucepan and simmer over medium heat, stirring occasionally, for 45 minutes or until thickened.
  • Add 3/4-1 cup of juices from the slow cooker until the sauce has a syrup-like consistency.
  • Adjust to taste: sweetness with brown sugar/honey, salt and sour with vinegar. Use per recipe.

Notes:

1. Pork/Pork Butt (aka Boston Butt) or pork shoulder — is the best for this recipe. They are nicely marbled with fat and need to be slow-cooked to become tender enough to shred with little effort. Get bone-in (pork butt almost always is, but the shoulder is sometimes not). Leave the thick layer of fat because it does all sorts of wonderful things to the meat as it slowly cooks (it self-bastes!).

ADVERTISEMENT

If it's got skin, it's best to remove it if you can (so spice can infuse better) BUT not the end of the world if you don't.

2. Smaller pork — use a recipe scaler if your pork is much less than 2.5kg.

Will also work well with pork scotch fillet roast (aka pork neck) — 8 hours slow cook on low. 

The recipe will also work for leaner cuts of pork like loin and tenderloin but will require shorter cook times and result in not being as juicy (because the meat isn't fatty enough).

3. Liquid — Braising liquid for flavour infusion. Any beer other than dark beers like Stout and Guinness. Hard or non-alcoholic cider is also terrific (or pear cider). For non-alcoholic, apple juice is my favourite. Emergency fallback: just use water!

4. Vinegar — white wine or champagne vinegar also works well here. Plain white vinegar can also be used but reduce it by 1 tbsp as it is a bit sharper.

5. Molasses adds an extra richness to the Barbecue Sauce and also deepens the sauce colour to the dark brown we know and love about barbecue sauce!

Other cooking methods:

  • Pressure cooker / instant pot — With slightly smaller pork (2-2.5 kg/4-5lb), I make this in my pressure cooker, 1 hr 20 minutes on high
  • Oven — 7 to 8 hours at 130C/270F, covered with double foil in a roasting pan with 2 cups of water (plus the beer per recipe). I rarely do this simply because of logistics — I don't like to leave the house or sleep with the oven on! But by roasting, you do get an amazing crust which I compensate for by roasting the pork briefly after a slow cooker. Note: slow cooker yields juicier pork.

7. Servings — This recipe makes a LOT! Partly because pork butts are BIG anyway, but also because if you make this with a smaller piece, it cooks faster = less flavour.

ADVERTISEMENT

A 3.5kg/7lb bone-in pork shoulder will comfortably feed 12 people if making a plate with sides.

If making sliders with Coleslaw, it will easily make 20.

8. Storage — freezes brilliantly, even after tossing with sauce. Or keeps in the fridge for 4 days. Best reheated in the microwave to keep things juicy and moist!

9. Nutrition per serving, pork and sauce only. Calories are quite overstated. A lot of fat gets discarded with the slow cooker juices you don't use. 

4. Spanakopita (Greek Spinach Pie). 

"This recipe here... It is the absolute BEST Spanakopita I've ever had — and I've had a lot of Spanakopita in my life. 10/10 delicious." — Talia Phillips, Senior Strategy Manager.

RecipeTinEat's Spanakopita. Image: RecipeTinEats.

ADVERTISEMENT

Prep: 40 minutes.

Cook: 25 minutes.

Servings: 5-6 people.

Ingredients: 

Spinach:

  • 300g/10oz English spinach leaves, trimmed from thick stems, thoroughly washed, dried, then chopped into 2.5cm/1" pieces (Note 1)
  • 1/2 tsp salt

Filling 

  • 175g/6oz Greek feta crumbled
  • 1/2 cup Greek yoghurt
  • 2 green onions/scallions, finely sliced
  • 1 egg
  • 2 tbsp mint, finely chopped
  • 1 tbsp dill, finely chopped
  • 1/2 tsp lemon zest
  • 1/2 tbsp lemon juice
  • 2 garlic cloves, finely chopped
  • 1/2 tsp nutmeg, freshly grated
  • 1/4 tsp black pepper
  • 1/4 tsp salt
  • 1/4 tsp cayenne pepper

Filo Pastry: 

  • 16 sheets filo pastry (Note 2)
  • 120g/ 8 tbsp butter, melted
  • 60g / 2/3 cup Greek Kefalotyri cheese, finely grated (sub parmesan, Note 3)
  • 1/2 tsp white sesame seeds (or more black)
  • 1/2 tsp black sesame seeds (or more white)

Instructions:

1. Preheat oven to 220°C/430°F (200°C fan). Line a tray with baking paper/parchment paper.

Filling: 

1. Sweat spinach: Place spinach in a large colander or bowl. Sprinkle with salt and toss through. Leave for 10 minutes to sweat.

2. Wring out water: Place a handful of spinach in a tea towel, then wring out tightly to remove excess water.

3. Filling: Place spinach in a bowl with remaining Filling ingredients. Mix well to combine

Assembly:

1. Trim filo: Cut 16 sheets of filo pastry into 32 x 25cm /13x10-inch (pictured) or 26cm/10.5-inch square.

2. 8 base layers: Layer 8 sheets of filo pastry on the tray, brushing each layer with melted butter.

ADVERTISEMENT

3. Filling: Spread filling on filo pastry. Smooth the surface and leave a 2.5cm/1-inch border.

4. 8 Filo topping layers (Note 4): Cover spinach with a sheet of filo pastry. Brush with butter and sprinkle with Kefalotyri. Repeat for Sheets #2 to #5. Then cover with filo sheets #6 to #8, brushing with butter in between, but do NOT sprinkle with cheese (neater finish).

5. Seal: Press edges down to seal. Crimp and trim if desired (see process steps in post or video) or just leave the edges flat on the tray.

6. Sesame seeds: Brush the top with butter and sprinkle with sesame seeds.

7. Bake: Bake for 25 minutes, or until golden brown on the surface.

To serve:

1. Serve immediately! It is at its absolute prime fresh out of the oven, though still good as long as it's hot (~15 min or so). The base does lose crispiness as it cools.

Notes: 

1. Spinach — This recipe is best made using bunches of fresh true spinach (not chard/silverbeet), known as English Spinach.

You will need ~2 large bunches weighing 600g/ 1.2lb in total to get ~300g/10 ounces of spinach leaves once trimmed from the stems. 

Pick off the leaves and weigh out 300g. Wash thoroughly (spinach leaves are notoriously dirty!). Then dry and chop. I dry using a salad spinner, in batches or spread out on tea towels and leave to air dry.

ADVERTISEMENT

2. Filo pastry (aka phyllo pastry) — Paper-thin pastry sheets used in Mediterranean and Middle Eastern cooking. It’s easier to use refrigerated filo pastry if you can, as it’s more pliable than frozen thawed and thus easier to handle. Take it out of the fridge 30 minutes prior. Once you take it out of the package, keep it covered with a slightly damp tea towel so it doesn’t dry out.

Australia: I recommend Antoniou brand filo pastry sold in the fridge section. You will need 1 x 375g pack which has 18 to 22 sheets in each pack (we need 16 for this recipe). See below for usage ideas for leftovers, including trimmings. If you use the frozen packs, you’ll need 1 pack but they often only have 15 sheets so you’ll need to assemble the offcuts to do one of the layers.

US: I understand the standard size is 1lb packs which has 40 sheets so you’ll have a fair amount of leftovers. Make 2 Spanakopita, hey?!!! 

Frozen phyllo pastry — Thaw overnight in the fridge. Don’t try to rush the thawing by placing it in a warm place. It makes the pastry brittle. Handle with care, as it is less pliable than refrigerated pastry.

Puff pastry alternative — Though not the same, you could use puff pastry instead of filo pastry. The bake time will be closer to 40 minutes.

3. Kefalotyri Greek cheese — This is a hard Greek sheep or goat’s milk cheese, similar to parmesan but not as salty. Best substitutes in order of preference: Kefalograviera, pecorino, parmesan or romano cheese.

4. Top layers — The cheese makes the top layers of filo pastry stick together so it doesn’t fly everywhere when you cut it. A neat trick! However, we also skip the cheese on the final 2 layers so you don’t see dark brown bits of cheese under the surface (ie. for visual reasons; it doesn’t look as nice if you can see golden brown cheese under the top layers of filo).

ADVERTISEMENT

5. Make ahead — As long as you extract the excess liquid out of the spinach very well, it can be assembled early in the day and then baked that evening which I have done successfully. I am not sure about leaving overnight. I don’t recommend freezing a raw Spanakopita because I think the filling will become watery as it thaws which will make the base soggy. Will update it if I try it out!

6. Storage and reheating — Spanakopita will keep in the fridge for up to 5 days. It’s best reheated in the oven – around 15 – 20 mins at 180C until hot in the centre (check the internal temperature with a metal skewer or paring knife touched to the lip, else a temperature probe). It won’t be quite as crispy as fresh, but still delicious! Microwave if you must but the pastry will not be crisp. Spanakopita is also perfectly tasty at room temperature!

7. Nutrition — For one serving, based on 4 servings total.

5. Christmas Baked Salmon.

"You want to be the belle of the ball at Christmas? Make this and see what happens. It's absolutely delicious and my family ADORE it." — Frankie Romano, NSW Sales Manager.

RecipeTinEat's Christmas Baked Salmon. Image: RecipeTinEats.

ADVERTISEMENT

Prep: 20 minutes.

Cook: 30 minutes.

Servings: 12 people.

Ingredients:

Salmon

  • 1.2-01.5 kg / 2.4-3lb salmon side (skin on, bones removed, Note 1)
  • 2 1/4 tsp salt, cooking/kosher (Note 2)
  • 1 tsp black pepper

Honey Butter Glaze:

  • 150g / 5oz butter, unsalted
  • 1/2 cup honey
  • 3 garlic cloves, finely minced (garlic press or knife)

Creamy Dill Sauce:

  • 1 1/2 cups sour cream, full fat (low fat is too watery)
  • 1/2 cup fresh dill, finely chopped (lightly packed cup)
  • 1/2 eschalot (French onion), finely grated
  • 1 1/2 tbsp lemon zest
  • 1/2 tsp salt, cooking/kosher (Note 2)

Holiday Tapenade:

  • 1 cup dried cranberries
  • 1 cup orange juice
  • 1 cup slivered almonds, toasted (Note 3)
  • 1/3 cup parsley, roughly chopped
  • 1/4 tsp each salt and pepper
  • 1 tbsp extra virgin olive oil

Finishing:

  • 1 pomegranate, only the seeds
  • 1/4 cup parsley, roughly chopped
  • 3 tbsp lemon juice
  • 2 lemons, extra, cut in 6 pieces each (for serving, don't skip this)

Instructions:

Creamy Dill Sauce:

1. Mix ingredients in a bowl until smooth. Keep refrigerated until required.

ADVERTISEMENT

Holiday Tapenade:

1. Heat orange juice in a saucepan over high heat until hot. Turn the stove off, add cranberries and cover. Stand for 15 minutes, then drain in a colander (discard liquid). Cool.

2. Mix cranberries, toasted almonds (see Note 3), parsley, salt and olive oil in a bowl. Use at room temp.

Cooking Salmon: 

1. Preheat oven to 180°C/350°F (all oven types).

2. Prepare salmon: Place a large sheet of foil on a tray (double layer for safety is recommended), then top with baking/parchment paper. Place salmon on paper, then fold up the foil sides a bit to cup them so the glaze won't run onto the tray.

3. Glaze: Place ingredients in a saucepan over medium-high heat. Once it starts foaming, turn it down to medium, let it foam for 2 minutes then remove and pour straight over the salmon.

4. Season: Sprinkle salmon with salt and pepper, putting most of the salt on the thicker part of the salmon.

5. Wrap: Cover salmon with a smaller piece of paper, then foil. Fold and seal up sides to enclose salmon in a parcel – it doesn't need to be 100% tightly sealed.

6. Bake for 15 minutes. Remove salmon from oven.

7. Uncover/fold excess paper — Remove paper and foil and paper cover. Fold/scrunch paper and foil sides down to expose the salmon's surface. Tucking paper down also ensures it won't catch fire when broiling.

ADVERTISEMENT

8. Grill/broil to brown: Switch oven to grill/broiler on high. Place salmon on the middle shelf in the oven and broil for 7 to 10 minutes until you get caramelisation mostly on the edges, a bit on top. Don't put it too close to the heating element otherwise paper might catch on fire! Check to ensure salmon is cooked — either pry open in the middle to check or use a probe to check internal temperatures (Note 4).

9. Transfer to plate: Use the foil overhang to transfer salmon onto the serving platter straight away (otherwise it keeps cooking). Slide the foil then paper out from under the salmon (see video at 1 min 24s or step photos in post), allowing juices to pool on a platter (it's gold stuff!).

10. Cool: Loosely cover with foil, then leave to cool for at least 15 minutes, up to 1 hour or longer (for room temp serving — Note 6 for serving notes).

Assembly and serving: 

1. Dollop then thickly spread with Creamy Dill Sauce (~0.8cm / 1/3" thick layer).

2. Pile over the Holiday Tapenade, scatter generously with pomegranate seeds, and then the remaining parsley. Squeeze over lemon juice.

3. Serving: Serve with extra lemon wedges so people can add more to taste. Cut into pieces — I use a cake cutter for serving. Encourage people to slop up some of the honey-butter sauce that will be mixed with semi-melted Creamy Dill Sauce — it's so good! This dish is best served slightly warm, not piping hot and also excellent at room temp.

Notes:

1. Salmon — Get a whole side of salmon in one piece. It should come with skin on (holds together better for moving once cooked) and bones removed (nobody wants pokey bones with a mouthful of Christmas Salmon!). Place salmon on the diagonal of the tray if it’s too large. A bit of overhang will be fine (on the thinner end). See Note 5 for fillets and trout alternatives.

ADVERTISEMENT

2. Salt — Cooking/kosher salt is the standard for all my recipes. The grains are larger than fine table salt so it’s easier to pinch and sprinkle. If you only have table salt, you MUST reduce the salt quantities by 25% otherwise your food may be too salty (because table salt is so fine, 1 tsp table salt =~ 1 1/4 tsp cooking/kosher salt).

Cooking/kosher salt is sold labelled as such at the grocery stores – here’s a photo of cooking salt and here’s a photo of Diamond Crystal kosher salt, a leading brand used in the US(not easily found in Australia).

3. Toasting almonds — Preheat the skillet over medium heat (no oil). Add nuts then stir for 2 minutes or until they smell amazing and are lightly browned. Keep them moving as they burn easily! Transfer to bowl straight away to cool.

4. Cooked salmon — you can just pry open the flesh in the middle to check. Otherwise, the internal temperature of cooked salmon is 43°C / 110°F for rare, 49°C / 120°F for medium-rare, or 54°C/130°F for medium. Grill cooks fast so just leave it for longer if you want it cooked more, move it down to the lower shelf to reduce browning.

No grill/broiler? Just crank the oven up as high as it will go put salmon in uncovered to brown and finish cooking.

ADVERTISEMENT

5. Alternatives for ingredients (in order of recommendation where multiple are given):

  • Salmon — Trout is an ideal direct sub (though typically smaller, so scale the recipe down or use multiple);
  • Salmon fillets rather than whole side – bake in foil for 10 minutes, then grill/broil for 10 minutes). Would also be VERY pretty in individual portions so it looks like this.
  • Smaller salmon side — eg the middle or just the tail end. For anything around 600g / 1.2lb and larger, follow the recipe as written in terms of cook times but scale quantities down by clicking Servings and sliding down until you hit the target salmon weight.
  • Butter — Best is ghee or clarified butter (store-bought or homemade) for dairy-free alternatives, followed by margarine.
  • Honey — Maple syrup, but simmer for an extra 1 minute to reduce a bit further
  • Sour Cream — The only suitable sub is spreadable (tub) cream cheese but that’s a bit thick so it would need to be thinned with a touch of olive oil to make it into a soft spreadable paste as pictured in the video. If you use block cream cheese, you’d need even more oil for thinning. The yogurt is too watery.
  • Dill — Classic herb for salmon, but can sub with chives or finely chopped green onions.
  • Almonds (all should be roasted, unsalted) — Whole (preferably blanched) almonds roughly chopped yourself, pistachios, walnuts, pecans, hazelnuts, and macadamias.
  • Nut allergy subs — Pepitas or sunflower seeds
  • Dried cranberries — Craisins, dried sour cherries (roughly chopped), golden raisins*, normal raisins* or sultanas*, any other dried fruit like apricots* chopped (items marked with * add 2 tbsp lemon juice into hot water for plumping, will add a touch of tartness as cranberries have)
  • Orange juice — Apple juice, any other non-thick fruit juice, water + 2 tbsp honey
  • Parsley — Chives or green onions
  • Pomegranate — These add colour and juicy little pops to the dish. No fruit provides anything quite similar in terms of colour but for flavour, the best is to use red (seedless) grapes. Cut into 1/6 or 1/8, about 3/4 cup. Cherries also work!
  • Dairy-free version — give it a Middle Eastern spin by using hummus instead of sour cream (just be sure it’s a nice thick consistency you can slather on), and instead of parsley use fresh coriander/cilantro instead (roughly chopped) and increase to 1/2 cup. It’s good, I made it with fillets. It’s a Christmasy version of Salmon Tarator, a traditional Middle Eastern dish from which this recipe was inspired.

6. Serving — Dish is best served warm or at room temp, not piping hot. If at room temp, make sure it is still warm enough so honey-butter-salmon juices are liquid and not firmed up (if solidified, melt for 10 sec in the microwave or 2 min in a very low 50°C/120°F oven is enough, can do this on serving platter).

Do not spread piping hot salmon with sour cream, it melts and slides off.

Skin is needed for easy handling of salmon while cooking but it’s not pleasant to eat because it’s not crisp in this recipe. People can either just avoid eating, or you can portion it without skin (it’s easy to slide cake serve between flesh and skin)

Be sure to serve with extra lemon wedges, this is a dish that loves fresh lemon!

7. Make ahead — Excellent for preparing the most ahead with simple assembly on the day.

  • Tapenade — 24 hrs in advance (fridge) but keep toasted almonds in the pantry and stir in before serving (a few hours ahead is fine), ensure it is at room temp when using.
  • Creamy Dill Sauce and Honey Glaze — 24 hours ahead, fridge (glaze will need to be reheated to make pourable).
  • Pomegranates — bash out the seeds the day before! See in post for how;
  • Salmon — is better baked fresh on the day but it is still stellar cooked the day before (based on all the leftovers I have been inhaling!). But honestly, reheating cooked salmon is just as much effort as baking fresh, in my opinion!

8. Storage — Leftovers will be kept for 3 — 4 days in the fridge. Allow to come naturally to room temperature. Do not microwave or oven reheat, the sour cream will melt.

9. Nutrition per serving, assuming 12 servings of 1.5kg/3lb salmon. With all the toppings, this is almost a main course size serving. So if it’s part of a banquet with other mains, this will easily stretch to 16 — 20 people.

Feature Image: RecipeTinEats.