food

4 super simple (but impressive) kids' birthday cakes that require no fancy equipment.


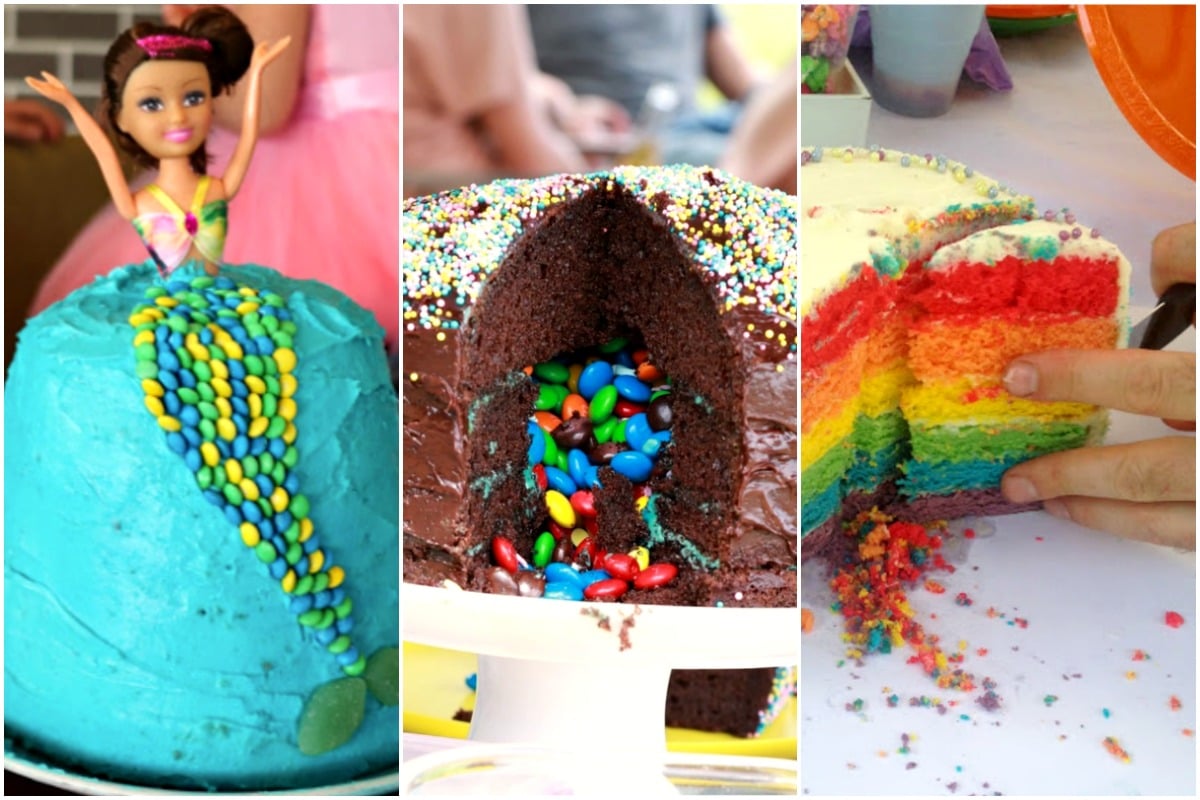
No fondant! No special cake tins! No piping bags! No tears!

Birthday cakes don’t need to be expensive or difficult to be impressive.

Prepare to be hypnotised by these colourful cake decorations. Post continues below.

Video via Mamamia

These four cakes can all be made with regular cake tins, packet cakes and plenty of sprinkles.

So start greasing your cake tins and let’s get baking!

Birthday cake making tips:

  • Feel free to use packet cakes, as they always turn out well.
  • Give yourself plenty of time. Bake the cakes the day before you need them, and then decorate on the day. This also makes the cakes easier to work with.
  • If you haven’t got a cake stand, wrap a large chopping board with wrapping paper for a quick display board.
  • Any leftover cake (is that a thing?) freezes well to eat later.
  • Remember that your child will love the cake even if it doesn’t look perfect.
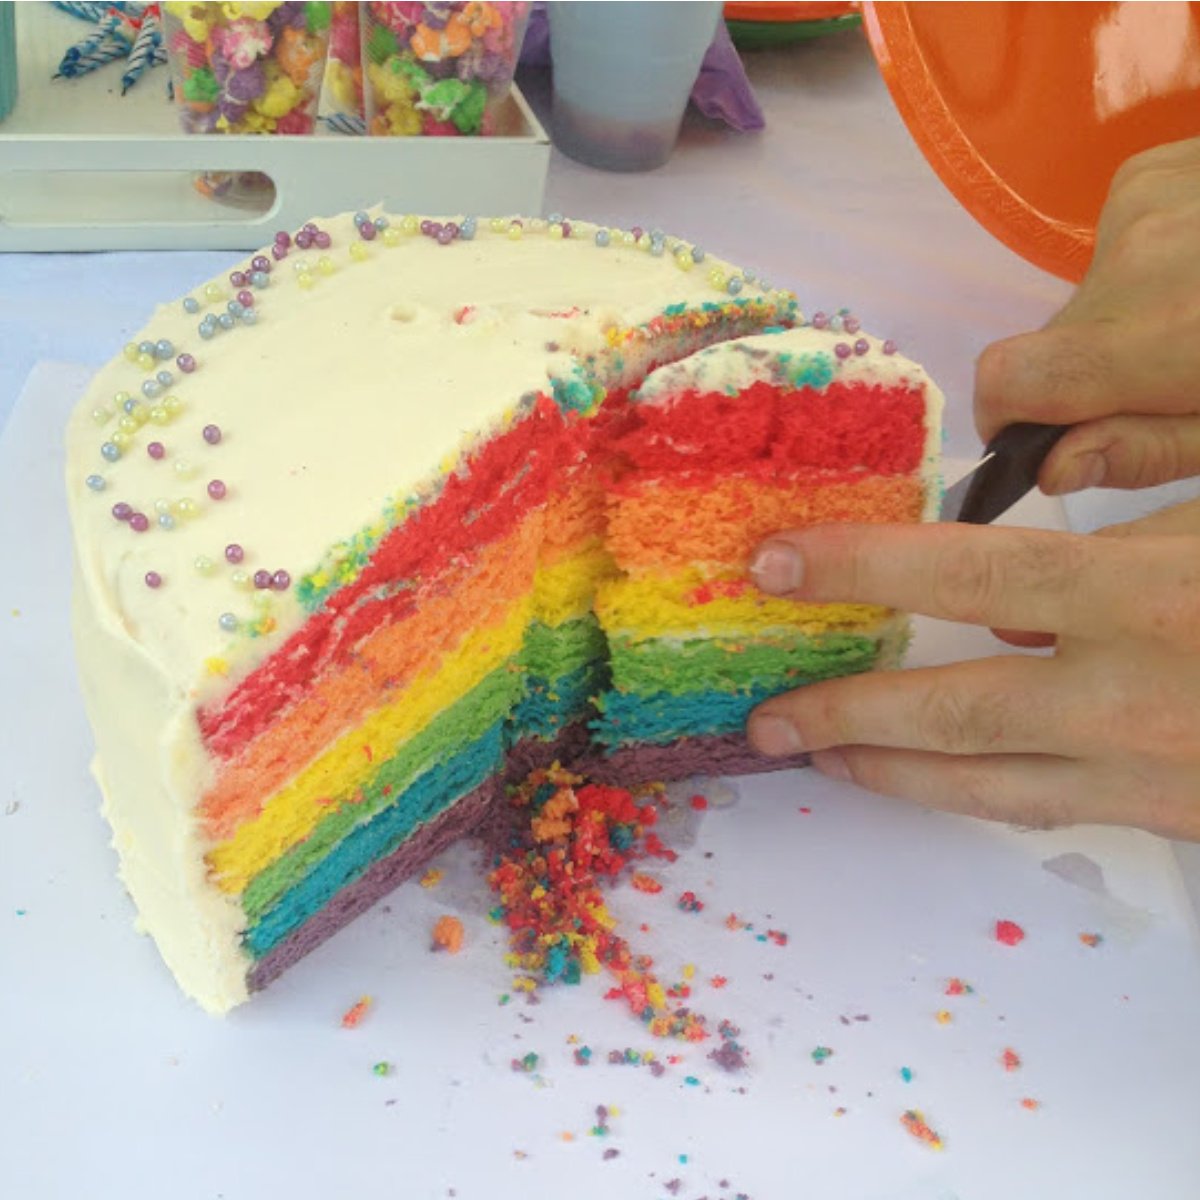
Rainbow Cake

Lee-Price-Rainbow-Cake-1
Rainbow Cake. Image: Supplied.
ADVERTISEMENT

This cake is going to surprise and delight everyone. Essentially, you’re cooking six separate cakes and then icing them together into layers. Cook the cakes the day before the party, giving yourself plenty of time. The more matching cake tins you have, the faster you can power through.

This cake is not hard to make, but it does take a while, so give yourself a solid chunk of time both on the baking day and the decorating day.

You will need:

  • 2 (or more) matching round cake tins, 20cm
  • 3 packets of cake mixture (vanilla or butter cake) and required ingredients (butter, milk etc)
  • Extra icing (made with icing sugar, butter, milk)
  • Food colouring
  • Sprinkles
  • Electric beaters

How to make a Rainbow Cake:

1. Grease and line your cake tins and set aside. Use electric beaters to prepare your three cake mixtures according to the directions on the pack, using three separate mixing bowls.

2. Set out six bowls, with a different food colouring for each one (I used red, yellow, green, blue, orange and purple).

3. Tip equal amounts of cake mix into each of the six bowls, add food colouring and stir.

4. Now you need to cook the six cakes. If you have two matching tins you can cook two at a time, if you have three tins you can cook three at a time and so on. Start checking on them at the 15 minute mark by inserting a skewer – if it comes out clean they’re ready.

ADVERTISEMENT

5. Allow the cakes to cool in the tins for 10 minutes before placing on a wire rack to cool completely. Then cook the remaining cakes until you have six cooked cakes. When completely cool, wrap in cling film and place in the fridge overnight.

6. You want the cakes to be flat for your layers, so the next day, use a bread knife to slice off any raised parts on top of the cakes, so that it’s an even thickness the whole way across. Don’t worry if some colours are higher than others, it will still look fantastic.

7. Prepare your icing, following the packet directions. You will need more than what came with the packet cakes, so prepare at least the same amount again.

8. Place the first colour on the board you’ll serve the cake on, then top with a thin layer of icing. Place the next cake on top and press down to combine. Keep layering icing and cakes until you have your six layers.

9. Put icing all over the top and sides of the cake, then place in the fridge for an hour to set. Bring it out and add another layer of icing to the outside so that you can’t see any of the colours inside. Decorate with a minimal amount of sprinkles and serve.

Mermaid Cake

Lee-Price-Mermaid-Cake-Close-Up-1
Mermaid Cake. Image: Supplied.
ADVERTISEMENT

The best thing about this cake is that the doll can be part of the present. Bake the three cakes the day before so that you just have to assemble it on the day.

You will need:

  • Three round cake tins (20cm)
  • 3 packets of cake mixture (any flavour) and required ingredients (butter, milk etc)
  • Extra icing (made with icing sugar, butter, milk)
  • Jam (optional) to join the layers together
  • Blue food colouring
  • Mini M&Ms (green, blue and yellow)
  • Spearmint leaf lollies
  • Electric beaters
  • A Barbie doll (not a mermaid as the tail will get in the way)

How to make a Mermaid Cake:

1. Prepare the mixture for your three cakes in separate mixing bowls. Grease and line your three tins.

2. Bake your three cakes as per packet directions, allow to cool in the tin and then cool completely on a wire rack. Wrap in cling film and place in the fridge overnight.

3. On the day, unwrap the cakes and slice any raised areas of cake so that you have three flat cakes for layering.

4. Use jam or icing to sandwich the three cakes together, then use a breadknife to slice the outside of the cakes into a volcano type shape.

5. If your packet cakes came with icing, make extra so that you have around double the amount of icing. Use plenty of blue food colouring to make it a vivid ocean blue.

ADVERTISEMENT

6. Grab your Barbie and push her legs into the top of the cake up to her waist. You can also cut a hole in the top of the cake to help her in, if needed.

7. Cover the whole cake with the blue icing and place in the fridge for an hour to set. Remove from the fridge and add some extra icing so that it is completely smooth and covered.

8. Press the M&Ms into the cake to make the mermaid tail. You want the edges of the M&Ms facing out to give it some texture. Use two spearmint leaves to make the base of the tail.

Number or Letter Cake

Lee-Price-Number-Cake
Number Cake. Image: Supplied.
ADVERTISEMENT

This is easy but so effective. Bake some cupcakes and fashion them into the shape of the child’s age, or the first letter of their name. Ice them together and decorate, and then the kids can grab a cake and go.

Use regular or mini muffin trays depending on appetites and ages of the children. One packet cake makes 12 regular cupcakes or 24 mini cupcakes. You can cook two packet cakes if you have lots of guests. Make the cakes the day before so that you can just assemble on the day of the party.

You will need:

  • Muffin tin trays (regular or mini) and liners
  • 1 or 2 packets of cake mixture (any flavour) and required ingredients (butter, milk etc)
  • Extra icing (made with icing sugar, butter, milk)
  • Food colouring
  • Sprinkles
  • Electric beaters
  • Wrapping paper for the serving tray (optional)

How to make a Number or Letter Cake:

1. Prepare your cake mixture according to packet directions (you can add food colouring here if you want coloured cakes) and pour into muffin tin cases. Bake as per directions and cool completely on a wire rack.

2. Grab a large chopping board or tray and cover with wrapping paper to use to serve the cakes. Set out the cakes into the required number or letter.

3. Prepare your icing and add food colouring based on colour preference. If your packet cakes came with icing, you’ll still need to make more so that you have roughly double the amount of icing.

4. Put a blob of icing onto the top of each cupcake, and then use a knife to spread it out so that the cakes join together. Decorate with sprinkles and candles.

Piñata Cake

Lee-Price-Pinata-Cake
Piñata Cake. Image: Supplied.
ADVERTISEMENT

This is fun as it looks just like a regular round cake. Then you cut into it and BAM! Piñata! Everyone gets a slice along with a scoop of lollies from the inside.

You could use a certain colour of lollies to match your party theme, or this would even work for a gender reveal party using all blue or all pink lollies inside.

Bake the cakes the day before, as it will make them much easier to work with on the day.

You will need:

  • Two matching round cake tins (20cm)
  • 2 packets of cake mixture (any flavour, I used chocolate fudge cake) and required ingredients (butter, milk etc)
  • Extra icing (made with icing sugar, butter, milk)
  • Lollies, chocolates and sprinkles for the filling (I used M&Ms)
  • Electric beaters

How to make a Piñata Cake:

1. Grease and line your two matching cake tins and set aside.

ADVERTISEMENT

2. Use electric beaters to prepare your two cake mixtures according to the directions on the pack, using two separate mixing bowls.

3. Cook the two cakes according to packet directions, then cool in the tin for 10 minutes before cooling completely on a wire rack. Wrap in cling film and place in the fridge overnight.

4. The next day, use a bread knife to slice each cake in half so that you have four round cakes. Slice off any domed tops on three of the cakes so that they are flat, you can leave one to use as your top layer.

5. Prepare your icing. If you are using packet cakes with icing, you’ll need about double the amount so that you can join the cakes together. You can colour the extra icing to use inside the cake if you like (I used green, just for fun).

6. Place one of the flat cakes onto the board or cake stand that you will use to serve the cake. Smear the top (only) with icing and then add the next flat layer. Ice the top of the second cake and add the third flat cake.

7. Use a knife to cut a hole (10cm diameter) in the centre of the top two cake layers, which you will use to hold the lollies.

8. Ice the top of the third cake, as well as the inside of the hole. Pour in your lollies and sprinkles, then add the final layer of the cake. Cover the top and sides with icing and decorate with sprinkles.

Which one will you be baking? Let us know in the comments below.

Feature image: Supplied.